
Packages #
“Packages” is a central feature that is further divided into three specific tabs, each serving a unique function:
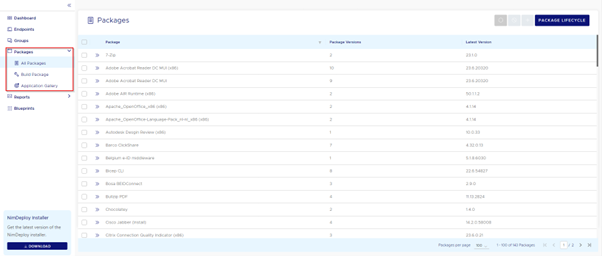
All Packages: #
- This tab provides a holistic view of every package that has been uploaded to your Azure Artifacts Library.
- Each listed package displays the number of its versions and highlights the most recent version.
- It’s important to be aware that there might be a slight delay between when a package (or a new version of it) is pushed to the Artifacts Library and when it becomes visible in the frontend.
- For a deep dive into any package’s details, you can click on the arrows adjacent to the package name. This action will expand the entry, revealing a more detailed view of the package’s specifics.
Build Package: #
- This section is dedicated to the creation of new packages.
- If you’ve previously created a package using the Package Builder, it’s not set in stone. You can always return to it for modifications. The “Edit” button in the “All Packages” tab facilitates this, allowing you to keep your packages updated as needed.
Application Gallery: #
- The Application Gallery showcases a collection of pre-packaged applications, diligently managed and continuously maintained to provide an effortless software experience for users like you.
- When you subscribe to an application, not only do you add it to your Artifacts Library, but Nimble also takes the responsibility of ensuring the latest versions of that package are automatically made available within your tenant. This guarantees you always have access to the most recent and optimized version of the software.
- Moreover, once subscribed to, each application is primed for easy deployment across all your devices using NimDeploy.
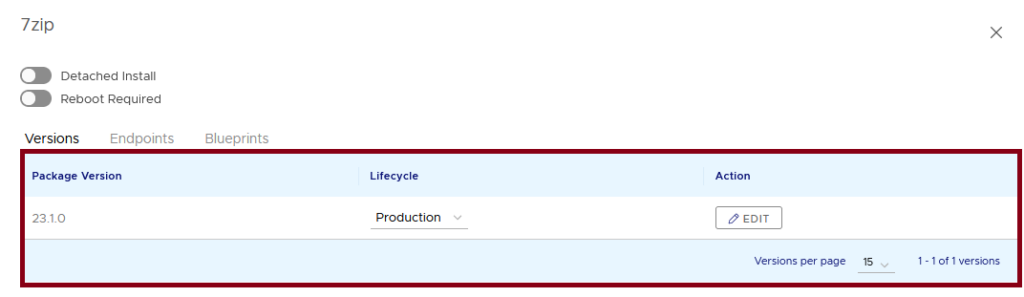
Package Details view #
On top of the view, we have 2 switches:
- Detached Install: When this switch is active, the package will be installed separately from the NimDeploy Service. This is currently only required for the nimdeploy_service package, which updates itself.
- Reboot required: activate this switch if you want to reboot the device after installing or updating the package during a deployment. The deployment will continue after the reboot.
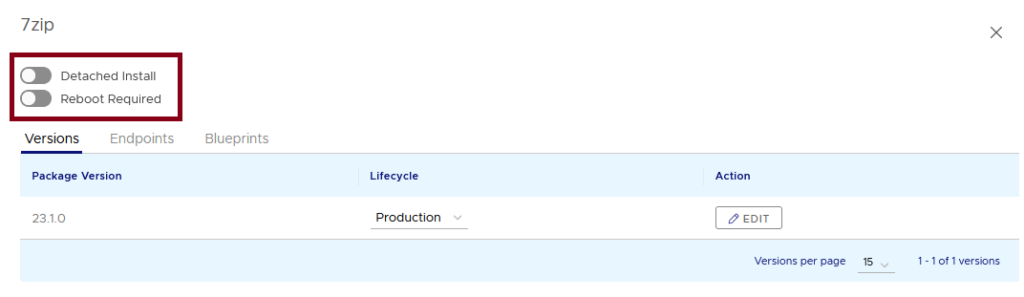
Each package can encompass multiple versions, with each new version distinctly displayed in this section.
Upon accessing the detailed view, the initial information presented pertains to the versions.
These versions come tagged with specific lifecycle statuses:
- Testing
- Acceptance
- Production
These statuses, combined with the lifecycle tags assigned to endpoints, dictate the version of the application an endpoint will receive via NimDeploy.
By default, new versions of a package are automatically classified under the “Testing” status. However, with the intuitive dropdown selector, transitioning between different lifecycle statuses becomes a breeze. This allows for precise management of a version’s lifecycle within a package. If you’re looking to streamline this process across your entire package library, the subsequent chapter delves into the efficient management of lifecycles using a dedicated wizard.
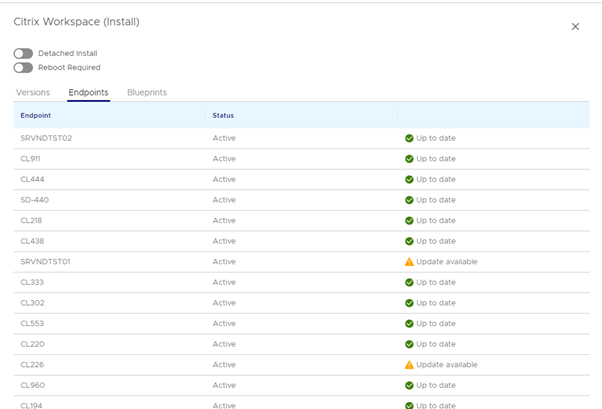
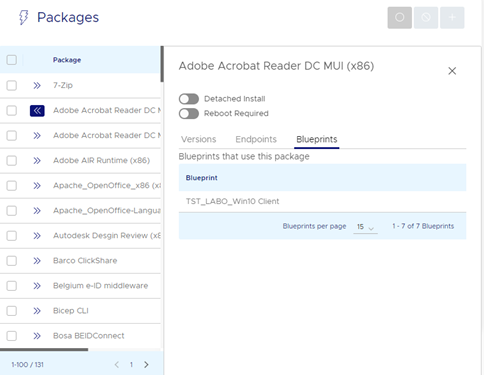
Package usage #
To monitor which devices utilize the selected package, navigate to the “Endpoints” tab. This view not only showcases all the endpoints to which the chosen package is assigned but also provides crucial insights into the package’s status on each device. It clearly indicates whether the package is current or awaiting updates. Such clarity enables you to swiftly identify and manage devices with pending updates, ensuring they remain in sync with the latest software enhancements. After all, ensuring devices are consistently up-to-date is the primary objective of NimDeploy.
The Blueprints view shows all the blueprint the package is assigned to.
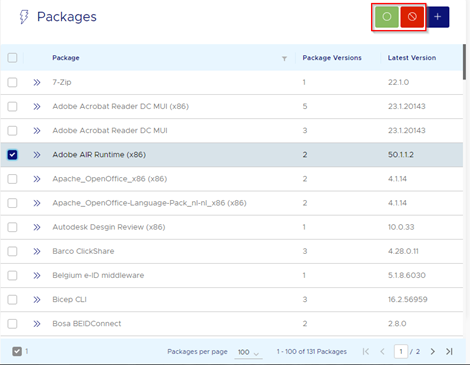
Enabling / Disabling packages #
Packages are by default enabled. If you want to disable a package, mark the checkboxes of the packages you wish to disable and click the red button at the top which says “Disable package” when hovering over it.
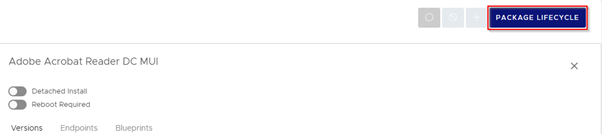
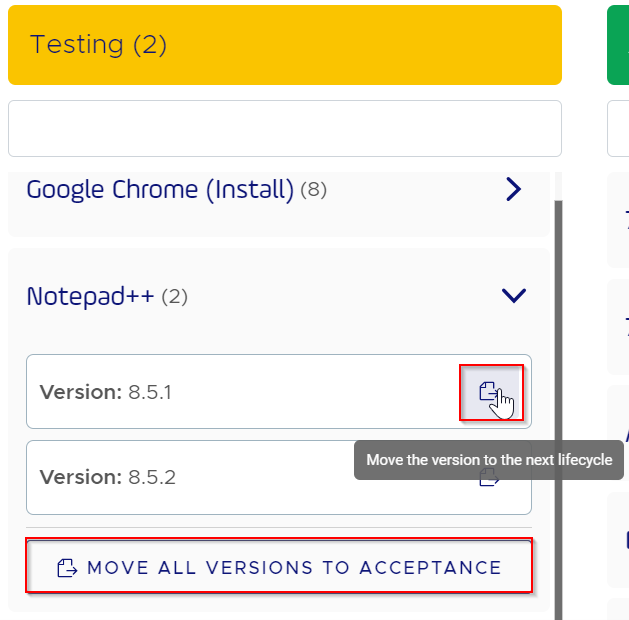
Package Lifecycle #
To manage the lifecyle of all the packages, click on the Package Lifecycle button.
This page gives a clear view in which lifecycle the different versions of the applications are that are managed by NimDeploy. It also functions to change the lifecycle of a version.
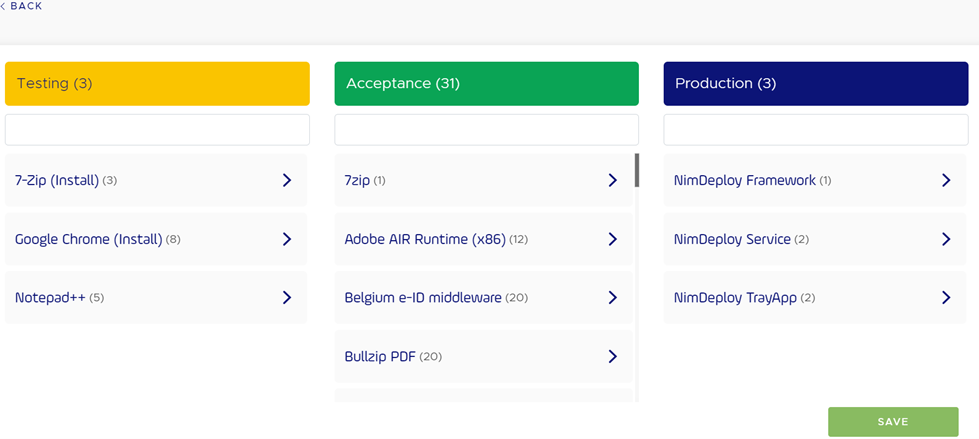
There are 2 ways to change the lifecycle of an application in this view:
- Drag & Drop the version into the new lifecycle.
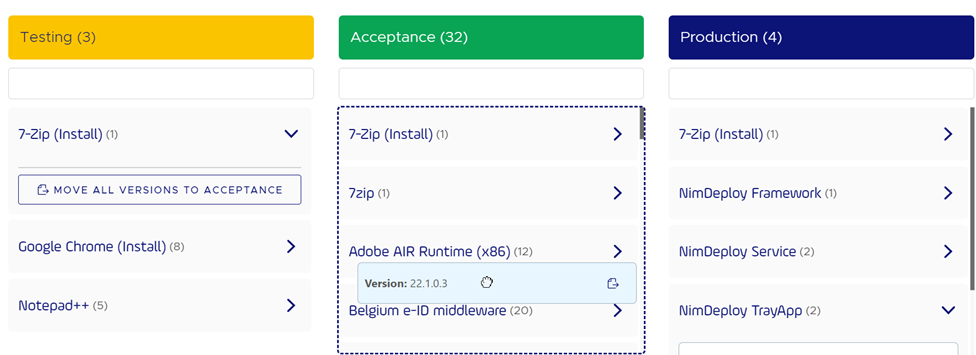
- Use the buttons to move a single or all versions to the next lifecycle stage.
Build Package #
The Package Builder in NimDeploy is designed for creating new software packages and updating existing ones. To modify a previously created package, navigate to the desired package version and click the “Edit” button. This tool ensures your software is current and meets specific requirements.
It’s also equipped to generate new package versions when there are updated installer files from the software developer. It’s important to note that the package library doesn’t allow direct modifications to existing packages. Instead, any updates or changes will result in the creation of a new version.
Below we’ll inform you about the requirements in the process of creating a new version or a new package:
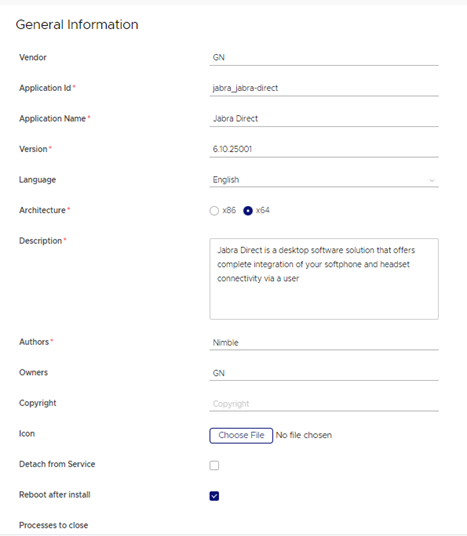
General Information #
| Tag | Required | Description | Examples |
| Vendor | No | Vendor of the application | Microsoft
Adobe |
| Application ID | Yes | The case-insensitive package identifier, which must be unique.
Naming convention: <vendor>_<app>_<blank or language>_<blank or installer type>_<blank or x86> |
Adobe_Acrobat-Reader-DC_MUI_x86
Microsoft_Visual-C++-2010-Redistributable_x86
Microsoft_Visual-C++-2010-Redistributable |
| Application Name | Yes | A human-friendly title of the package, this will be displayed as the name of the package in NimDeploy. | Adobe Acrobat Reader DC MUI
Microsoft Visual C++ 2010 Redistributable x86
Microsoft Visual C++ 2010 Redistributable |
| Version | Yes | The version of the application | |
| Language | No | Choose the language of the application. This is purely informational and doesn’t affect the package | Dutch
English French |
| Architecture | Yes | Architecture of the application | X86
X64 |
| Description | Yes | Short description of the application that will be installed | |
| Author | Yes | Company/User that created the package | |
| Owners | No | See Vendor | |
| Copyright | No | Copyright details for the package | |
| Icon | No | Package icon that will be displayed in NimDeploy | |
| Detach from Service | No | This setting lets you specify whether the package should be detached from the service during installation. Default value is false. | |
| Reboot after Install | No | This allows you to indicate whether the system should be rebooted after installing the package. Default value is false. | |
| Processes to close | No | A comma-delimited list of processes that need to be closed gracefully before upgrading. | Notepad++.exe when upgrading notepad++ |
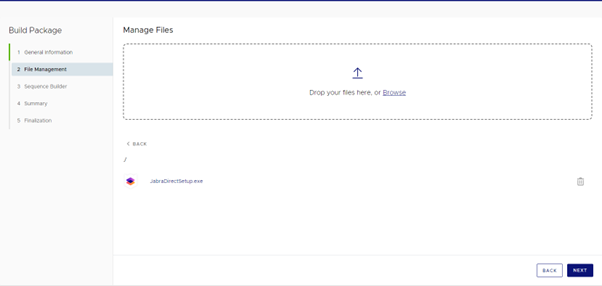
File Management #
In this tab, all the required files that are needed for the installation of the application need to be added. This could be EXE-files, MSI installers, ZIP-files, folders, …
Sequence Builder #
The sequence builder consists of many different helper functions which can be used to create the code behind the package without having to write or needing the knowledge of Powershell code.
| Function | Description | Parameters |
| Install-ChocolateyInstallPackage | Install software into “Programs and Features” | PackageName: The name of the package. Automatically filled with the Application ID that has been defined in the General Information tab.
FileType: This is the extension of the file. This can be exe, msi or msu.
SilentArgs: Arguments that allow for automated software installations without requiring the end user to do anything. (Ex. /S, /silent, /qn, …)
File: Full filepath to the installer that was added in the File Management tab. Can be selected from dropdown menu.
File64: Full filepath to the 64-bit installer that was added in the File Management tab. Only use when you added both the 32-bit and the 64-bit installer.
ValidExitCodes: Comma-seperated array of exit codes indicating success. Default is 0.
UseOnlyPackageSilentArguments: Do not allow additional silent arguments.
|
| Add-ND-Shortcut | Add a public desktop and/or start menu shortcut | TargetPath: Path to the file you want to create a shortcut for.
Name: Name of the shortcut.
Startmenu: Whether a startmenu shortcut is created.
Desktop: Whether a desktop shortcut is created.
WorkingDirectory: Specifies the path in which the running executable will look for and read files.
IconLocation: Specifies the path to the Icon for the shortcut. |
| Copy-ND-File | Copy a file to a directory | FilePath: Path to the file that has to be copied.
Destination: The path where the file has to be copied to. |
| Import-ND-Fonts | Copies and registers fonts from a folder | Path: Source path containing the font files. |
| Import-ND-RegKeyFromFile | Silently import a registry file | Path: Source path containing the registry file. |
| Install-ND-LanguagePack | Install a Windows language pack | Path: Path to the cabinet file.
LanguageCode: The language code for the wanted language pack. |
| Invoke-ND-PSScript | Runs a Powershell script file | File: Path to the Powershell script file.
Arguments: Additional arguments you wish to provide. |
| Register-ND-LibraryFile | Registers OCX or DLL files from a single file or folder | Folder: Path to folder containing OCX or DLL files.
File: Path to OCX or DLL files. |
| Unregister-ND-LibraryFile | Unregisters OCX or DLL files from a single file or folder | Folder: Path to folder containing OCX or DLL files.
File: Path to OCX or DLL files. |
| Remove-ND-InstallFiles | Removes the install files from the location where the nupkg file had been extracted | PackageName: Name of the package. Can be left empty. |
| RunTask | Create a task that run powershell code provided in the scriptblock | TaskName: Name of the task that gets executed.
TaskParameters: The parameters required to execute the task.
UsedFunction: The internal function that gets used alongside the TaskParameters.
ScriptBlock: Powershell code that needs to be executed. |
| Set-ND-AclPermission | Sets ACL Permissions to a file, folder or registry key | Action: Specifies the action to add or remove an ACL permission.
Options: Add, Remove
Path: Specifies the file or directory the permissions apply to.
ADObject: Specifies the Active Directory Object.
Permission: Specify the ACL permission. Options: FullControl, Modify, ReadAndExecute, Write, ReadKey. NOTE: Only FullControl or ReadKey is accepted for a registry modification.
AccessType: Specifies the access type. Options: Allow, Deny
AccessRule: Specifies the access rule. Options: FileSystem, Registry |
| Set-ND-Dism | ||
| Set-ND-FileSystem | Create or delete a file or a folder | ActionType: Determines whether a file or folder gets created or deleted.
Options: Create, Delete
ItemType: Specify the type of the new object. Options: Directory, File
Name: Name of the object.
Path: Destination path. |
| Set-ND-OwnerShip | Takes ownership of a registry key, folder or file | SubKey: Sub Registry key
BaseKey: Base Registry key Options: ClassesRoot, CurrentConfig, CurrentUser, LocalMachine, Users, PerformanceData
Path: Path to folder or file
Identity: Account or group that needs to receive the ownership
TargetType: Specifies the target type. Options: FileSystem, Registry |
| Set-ND-PrintDriver | Installs the print package driver in the printer catalog and local print server | DriverName: Name of the driver that needs to be registered on the local print server.
Path: Path to the .inf driver file. |
| Set-ND-Registry | Sets a registry value | Path: Path to the registry key.
Name: Name of the registry key.
Data: Value of the registry key.
Action: Specifies whether to remove or add the registry key. Option: Add, Remove
|
| Set-ND-ScheduledTask | Set a pre-existing scheduled task | TaskName: Name of the scheduled task.
TaskPath: Path to the scheduled task.
Disable: Disable the specified task. |
| Register-ND-ScheduledTask | Create a new scheduled task | Name: Name of the scheduled task.
Action: Actions that need to be executed when running the task.
Trigger: Set what triggers the action to start.
Principal: Specifies the security context in which a task runs.
LogonType: Set the type of account that needs to be used.
RunLevel: Level at which the task must be run. |
| Set-ND-Service | Change the status and the startup of a service | Name: Name of the service.
StartupType: Set the startup settings for the service. Options: Automatic, Disabled, Manual
Status: Set the status of the service. Options: Paused, Running, Stopped |
| Sync-ND-Folder | Checks all the files in the source and destination directory and will copy only the files not yet present in the destination directory.
Function can handle UNC paths. |
SourcePath: Path to the source directory.
DestinationPath: Path to the destination directory. |